Navigation
Helpdesk
For accounts and assistance email the helpdesk at helpdesk@eionet.europa.eu
Account services
- I have lost my password
- View my memberships
Interest Groups
- All Eionet groups
- All ETC groups
- NFP/Eionet group
- Management Board
- Scientific Committee
- Forum test site
The Eionet password expires two years after it was last changed.
You can manage your data and change your password on the Eionet Portal
Administration of an Interest Group
The Administration area of each IG is accessible from the upper link Admin, when the authenticated user has the proper rights. It allows several operations to customise:

- Generic properties of the portal
- Your IG look&feel;
- IG activity monitoring (using Google Analytics)
- Users, roles and permissions
- Sending bulk emails to users
- Configuration of automatic notifications
- Map management
- Content management
- Syndications (local and remote feeds)
- Definition and management of portlets
- etc.
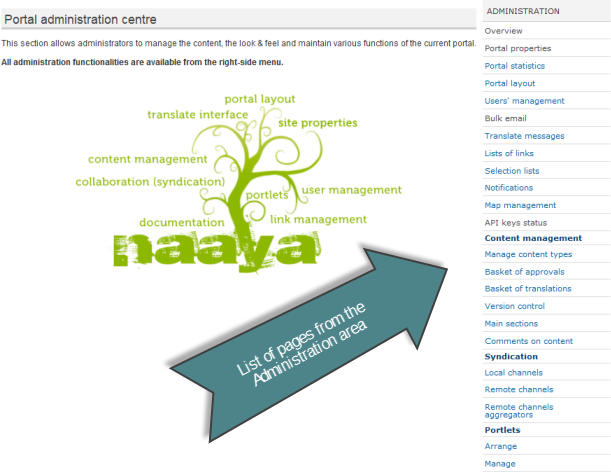
Most of the configurations available to Administrators from this area come from the default Naaya Content Management System administrative area, so not all of them will be relevant to the management of an Eionet IG. For instance, Naaya allows building multilingual portals, and has a section called Translate messages; since most IGs have their content in English only, this page is usually not relevant for an IG Administrator.
Just to keep in mind that much more options for customising an IG are available for technical users having the role of Manager, from the Zope Management Interface. Therefore, when the existing options from the Administrative area do not solve your problem, you can always refer to the Eionet Helpdesk for more options.
Portal properties
This set of pages is available from the Portal properties link of the Administration area. It has four tabs for the configuration of:
- Metadata – generic attributes that describe the portal:
- the site title appears in the header of all IG pages, after Eionet Forum
- the site subtitle appears in the listing of IGs, on the front page of the containing website (e.g. forum.eionet.europa.eu)
- Publisher, Contributor, Creator, Rights can be optionally filled in to describe who is in charge and responsible for the content published in the IG, see more details on the DublinCore website
- the description appears on the front page of the IG, and can contain images, links, lists and other Web formatting; it can be edited using a friendly HTML editor
- Logos allows changing the left and right logos from the header of each page. By default, the Eionet logo is displayed on the right side, with no left logo
- Email settings specify what is the email address from which notifications should be sent (e.g. "noreply@forum.eionet.europa.eu"), a list of addresses of the people in charge of the portal who receive upload or other kinds of notifications and a list of emails of technical persons (optional) who will receive emails when errors occur in the portal. This last option is used for monitoring purposes
- Other properties allows all sorts of configurations, from which
two are particularly relevant for an IG:
- Restrict portal denies unauthenticated users access to this portal
- Is this portal archived? is used when an IG no longer has activity upon the content (upload, change). End users are not able to request access to archived portals, but only see the content if the IG is publicly available
Access statistics
User management
The security priciples of an IG are based on users (coming from the Eionet Directory), permissions to execute different operations, and roles, which are groups of users with the same permissions. Detailed information about the administration of these can be found at the dedicated section of this help.
Notifications
The page for the management of notifications is accessible from the Notifications link of the Administration area. It is divided in four sections: configuration of notifications, option to disable the notifications temporarily, subscribe users to receive notifications and list of existing subscriptions.
Usually, the users subscribe themselves to receive a certain type of notifications on one or more parts of the IG. In some cases, Administrators can perform this operation for them.
Configuration of notifications
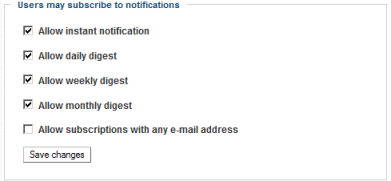
This first section allows Administrators to choose the types of email notifications will be available to end users to subscribe to. The full set of choices is:
- Allow instant notification sends an email to each subscriber almost immediately after an item has been added or changed in the IG
- Allow daily digest sends an email to each subscriber with a compilation of the items added or changed during the previous day
- Allow weekly digest sends an email to each subscriber with a compilation of the items added or changed during the previous week
- Allow monthly digest sends an email to each subscriber with a compilation of the items added or changed during the previous month
- Allow subscriptions with any e-mail address offers the possibility for people without an account in that IG to subscribe to receive notifications; this option is rarely checked, since stakeholders are almost always part of the Eionet community, which entails they already have an Eionet account
On each portal there is another notification type (that cannot be turned off): the Administrative notification. As suggested by the name, only users with an administrator role can subscribe to these notifications. They are sent whenever an object is created, added, or commented, regardless of its approval status. It is a tool for administrators to keep an overview of the site's events, especially to be notified when they need to review and possibly approve new items. This functionality replaces the old one where each user with an administrator role would automatically receive similar notifications, and there was no unsubscribe possibility.
Disable notifications
It is sometimes useful to disable notifications for the items uploaded by a certain user for a period of time. This can be done when migrating a website, when making a software update, or when uploading many, many items at a time. This can be accomplished by clicking the Disable notifications, in which case it is important to remember to turn the notifications back on when the maintenance work is completed.

Subscribe users
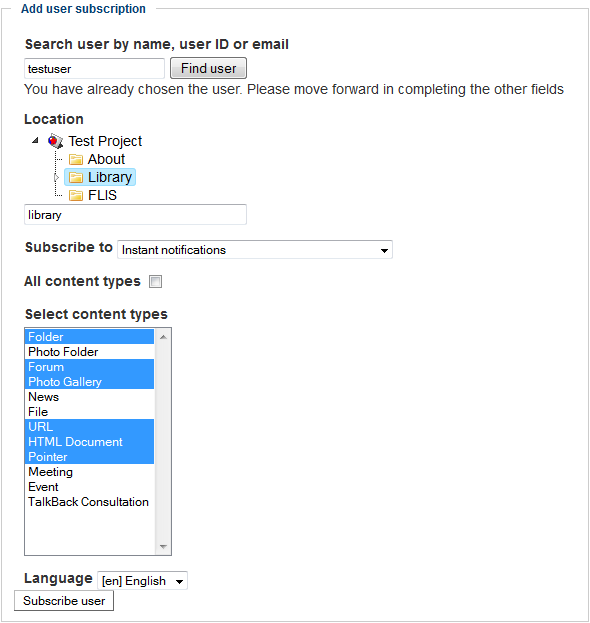
Although the system assumes that the users subscribe themselves to receive notifications, and tailor their options based on their preferences, there are situations when administrators need to do this for the users. The steps are:
- search for a specific user (by Name, Username or eMail)
- select it from the list of results
- check the location in the IG that user will be subscribed to (the entire portal or just a specific folder)
- choose the type of notifications from the available ones
- Optional.
- Uncheck the "All content types" checkbox
- Select the content types for which the subscription should be valid
If you want subscribed to more than one folder, or to receive more than one types of notifications, the operation needs to be repeated.
List of subscription
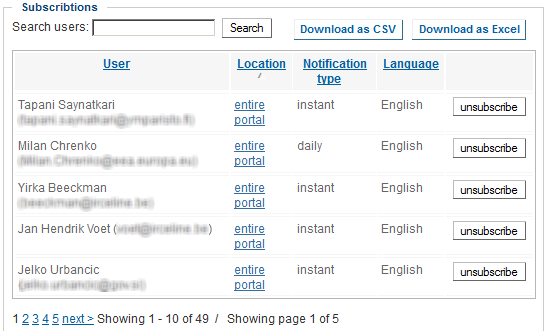
The last part of the notifications administrative form lists all existing subscriptions, initially sorted by users. For each subscribed user, the following information is available:
- User name and email address
- Location(s) in the portal where the user has subscribed to, and from where (s)he will receive notifications on new or changed items
- Type of notification – instant, daily, weekly, monthly
- Language – almost always English, as the IGs are usually not multilingual portals
- Unsubscribe button, allowing Administrators to remove subscriptions for users that should not receive notifications anymore, for instance because they left their job which entitled them to participate in the IG activities
The table listing the subscriptions can be sorted by each column. If you are looking for a particular user, you can type a few letters from its name or email address in the upper Search users box.
The list of subscriptions is exportable in CSV and Excel formats, for more options of sorting and filtering.
Map management
First about the map
Naaya map searches for all content that is geo-taggable and geo-tagged and displays points on a map for these item. Each Naaya content type can be geo-taggable, but this does not always make sense, of course: for instance, it makes sense to show the meetings on a map, but not the documents. Or, at least, not in the generic IG. For more details on how to manage the geo-taggable content types, see the section Manage content types.
When adding a geo-taggable item in an IG, content contributors have to specify an address and use the map engine to find the right coordinates of that address, as shown in the image below:

The map then shows all items (meetings, events, picturs, etc.) that have
geographical coordinates. The map is available in each IG at the address
<IG_URL>/portal_map

When two or more points are close to each other, they appear with a single pin, until you zoom close enough.
Map settings
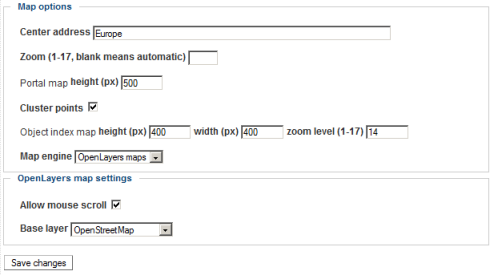
The backgrounds on which the points are shown can come from different sources. Four map services (including backgrounds) are currently integrated in Naaya: Bing maps, Google maps, OpenLayer maps and Yahoo maps. The first administration page for the Naaya map – available in each IG admin area from the link Map management – allows you to choose the service you want, along with specific configurations for it. The generic map options, regardless of the service chosen, are:
- Center address – a location that will be the centre of the map, such as Europe, or Denmark, or Bucharest
- Zoom (1-17, blank means automatic) – how much the map should zoom to the above location; you should adjust this zoom after viewing how the chosen location fits into the map, on different screen sizes. For instance, Europe might be very small if seen on a wide, short map, so you might decide to zoom in a little bit, even if not all parts of Europe are visible without zooming out
- Portal map height (px) – while making this setting, keep in mind that the map will stretch to fill all the available width. Consider the different resolutions and screen sizes your users will have, as well as the shape of your area you would like to display (e.g. Portugal is tall and narrow, while Austria is wide and short), and decide on a height that best display this area when the map is first rendered
- Cluster points – check this option if you want that points that are very close to each other to be displayed as a single point when the map in zoomed out; this technique is useful when you have a larger number of points on the map
- Object index map height (px) width (px) zoom level (1-17) – this setting applies to the small map shown on each item; when an item is geo-taggable and its contributor has chosen coordinates for it, a small map appears on the page for that item (e.g. a Meeting)
- Map engine – a choice between the available services: Bing, Google, OpeLayers and Yahoo maps
When a certain engine is chosen, the specific configurations available for that engine are shown. They are different from one service to another, as each service implements the maps a bit differently.
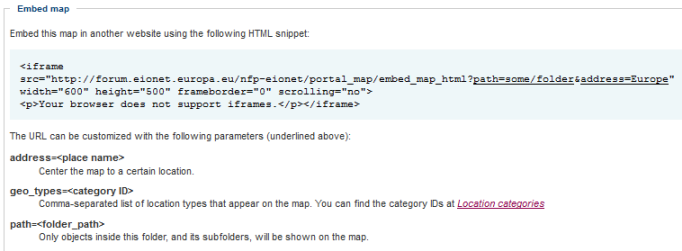
The last part of this form shows the code to be used if you want to integrate the IG map in other websites using an iFrame. In this case, the map can be pre-configured, by providing arguments such as the location the map to be initially zoomed to, types of locations to filter by and path in the portal (folder) from which to get the items. The code displayed in this form shows how to write all these filters.
Types of locations
When adding or editing a geo-taggable item, users are asked to fill in an address or geographical coordinates, as explained above, as well as the type of location of that item. The types of locations are defined in the map management area, tab Location categories. The default categories are Meeting, Workshop and Conference, as the targeted content types for geo-tagging are mostly Meetings and Events. When Administrators edit this list (add, delete, modify an item from the list), the changes will be immediately reflected in the select box from the edit forms of the content types.
For every location type, you must define how the corresponding points will appear on the map. This can be done either by specifying a colour for the generic pin, or upload another small image. The simplest way is, of course, to use the standard pins in different colours for the different categories of lcoations. If you want to dedicate more time to this, you can design and upload specific icons for locations representing people, organisations or meetings.
The types of locations appear on the map page as filters. If the list is long, it is useful to organise it in groups of locations, in which case you will define some categories as having a "parent" category from the add/edit location type form.
